Ruby On Rails setup on Ubuntu using VMware Player on Windows
If you are a Ruby On Rails developer and you have laptop or desktop with Windows OS, then you might get frustrated with the speed of execution of your application.
One way to get a faster environment on your system for development is to run Ruby on Ubuntu using VMware player.
Here, I am describing a step by step procudure using which you can start your Ruby on Rails development on a much faster platform as compared to windows and that’s Ubuntu.
1) Download latest ISO file for Ubuntu :
Download Ubuntu Desktop (32-bit recommended) from ISO File for Ubuntu
2) Download Vmware Player from the VMware’s website
For downloading, just create an account and vmware player is a free product for non-commercial use. Download VMware Player
From the above link download “VMware Player for Windows”
Once you have downloaded the exe file for VMware player then follow the steps mentioned in the link below, keeping in mind two things :
-
the path where you have saved the ISO image of Ubuntu
-
the last section of the link below “Integrate Ubuntu with Windows 7” is not necessary.
Installing Ubuntu on VMware Player
After this, go to Virtual Machine Settings » Hardware , and increase the “Memory” to 1 GB.
3) Update your Ubuntu :
Now open the terminal and enter the following commands :-
sudo apt-get update
sudo apt-get upgrade
while upgrading, it will ask for permission Yes/no (Y/n) , so just press y and enter.
4) Install RVM (Ruby Version Manager) & GIT :
In the terminal, enter the command
curl -L get.rvm.io | bash -s stable
Now close this terminal. Open a new terminal and enter the command given below to check the packages required by rvm
rvm requirements
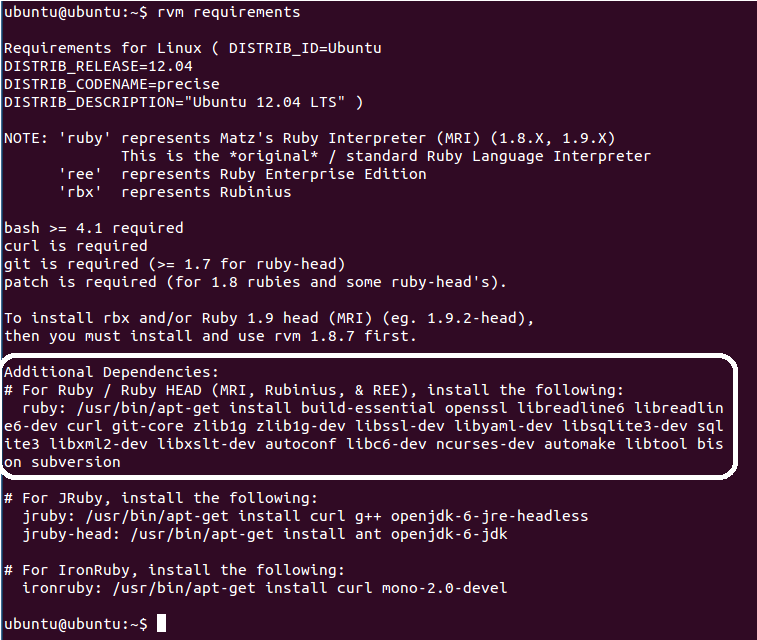
Now install the packages required by RVM by entering the below command
sudo apt-get install build-essential openssl libreadline6 libreadline6-dev curl git-core zlib1g zlib1g-dev libssl-dev libyaml-dev libsqlite3-dev sqlite3 libxml2-dev libxslt-dev autoconf libc6-dev ncurses-dev automake libtool bison subversion
The above command will install git as well.
To see coloured diff in ubuntu terminal, enter the below command
git config --global color.ui auto
5) Install Ruby :
To install ruby use the command
rvm install 1.9.3
where 1.9.3 is the version of ruby and it will install the latest patch
To install other versions(for ex ruby 1.9.2), you can use
rvm install 1.9.2
and to install a specific patch (say patch 125 for ruby 1.9.3)
rvm install 1.9.3-p125
You can check the installed versions of ruby by using the command :
rvm list
Now after installing ruby, go to Edit menu of the terminal, click on “Profile Prefernces” , and check “Run command as a login shell” ,then click on close.

Now you can use any version of ruby you have installed by using the command
rvm use <ruby version>
For ex :
rvm use 1.9.3
6) Install Gems :
Ubuntu manages gems of ruby in gemsets.
Default gemset is global.
You can check the same using the command :
rvm gemset list
You can also create your own gemset using the command :
rvm gemset create <gemset _name>
For ex :
rvm gemset create rails_3.2.6
To use a specific gemset, use the command
rvm gemset use <gemset_name>
For ex :
rvm gemset use rails_3.2.6
You can also set the default version of ruby & default gemset you want to use by using the command
rvm use --default <ruby-version>@<gemset-name>
where ruby-version is one among the list which you get after entering the command : rvm list
For example, say I want to use ruby 1.9.3 & gemset rails_3.2.6 by default always then I will enter the command
rvm use --default ruby-1.9.3-p194@rails_3.2.6
You can set the deault ruby version & gemset seperately using the command :
rvm use --default ruby-1.9.3-p194
rvm use --default @rails_3.2.6
7) Install MySQL :
Install the MySQL server using the command
sudo apt-get install mysql-server
During the installation process you will be prompted to enter a password for the MySQL root user , so enter the password or otherwise if you want to set any password then leave the password field and just press enter.
In future, you may want to change the MySQL root password, it can be done using the command
sudo dpkg-reconfigure mysql-server-5.5
Install MySQL GUI Tool using the command
sudo apt-get install mysql-workbench
You might be using MySQL Administrator & MySQL Query Browser as GUI Tool but the support of both has been removed from Ubuntu 12.04 onwards and mysql-workbench has been introduced as their replacement.
If you try to install MySQL Administrator & MySQL Query Browser package using the command
sudo apt-get install mysql-admin mysql-query-browser
then you will get a error message like
 Error : Unable to locate package mysql-admin
 Error : Unable to locate package mysql-query-browser
8) Sharing your projects folder residing in Windows with Ubuntu :
Easy step by step process for the same is given in the link below :
Share folders from Windows with Ubuntu
For adding folders, click on Add then Next and then browse the folder which you want to share.
You will be able see all the folders which you have shared in your Ubuntu from the location which you have mentioned in step 3 of the above link.
9) Install Sublime Text 2 :
Go to the link Sublime Text
Downlaod the Linux 32 bit version of the same.
From terminal go to the downloaded location means the folder in which Sublime Text 2 is there and follow the steps from Step 2 to Step 4 from the link Steps for Sublime Text 2
To open a project in sublime, open Sublime editor and just drag the project directory onto it.
You’ll then be able to browse using the sidebar, and also quick search using Ctrl+P .
One more important thing is that whenever you update your project folder in windows then, On Sublime you need to go to “Project” menu and click on “Refresh Folders” to get updated files on sublime.
Your Ubuntu is now ready, I hope you will now be able to start your project development on Ubuntu.